Monday, November 21, 2011

Sally Hansen salon effects review: 340 girl flower

I bought this box of Sally Hansen Salon Effects in Girl Flower (# 340) almost a year ago from Priceline for some ridiculously overcharged pricing. I've only gotten around to trying them because in my mind, I thought they'd be like any other nail stickers that I've tried previously (click here for Blinx) so there was no real temptation. Out of boredom (fine, I admit, I had ran out of nail art ideas), I gave these a go since I bought another box stashed away some where.

These "real nail polish strips" claim:
☺ No DPB, toluene, or formaldehyde
☺ Lasts up to 10 days
☺ No dry time
☺ Peel & apply
☺ Remove with polish remover
☺ Fits all nails (16 nail polish strips with cuticle stick, mini file & buffer)

Application:

This was easy enough. I did exactly as the instructed by the little pamphlet. Prepped my nails, trimmed the sticker to size, peeled off a layer from the top and a layer from the bottom to reveal the actual strip sticker, then just placed it on my nail. There was no stretching, blow-drying, or any other crazy nonsense involved. Then I just simply folded the excess over then filed the off using the file provided in a downward direction perpendicular to my nail.
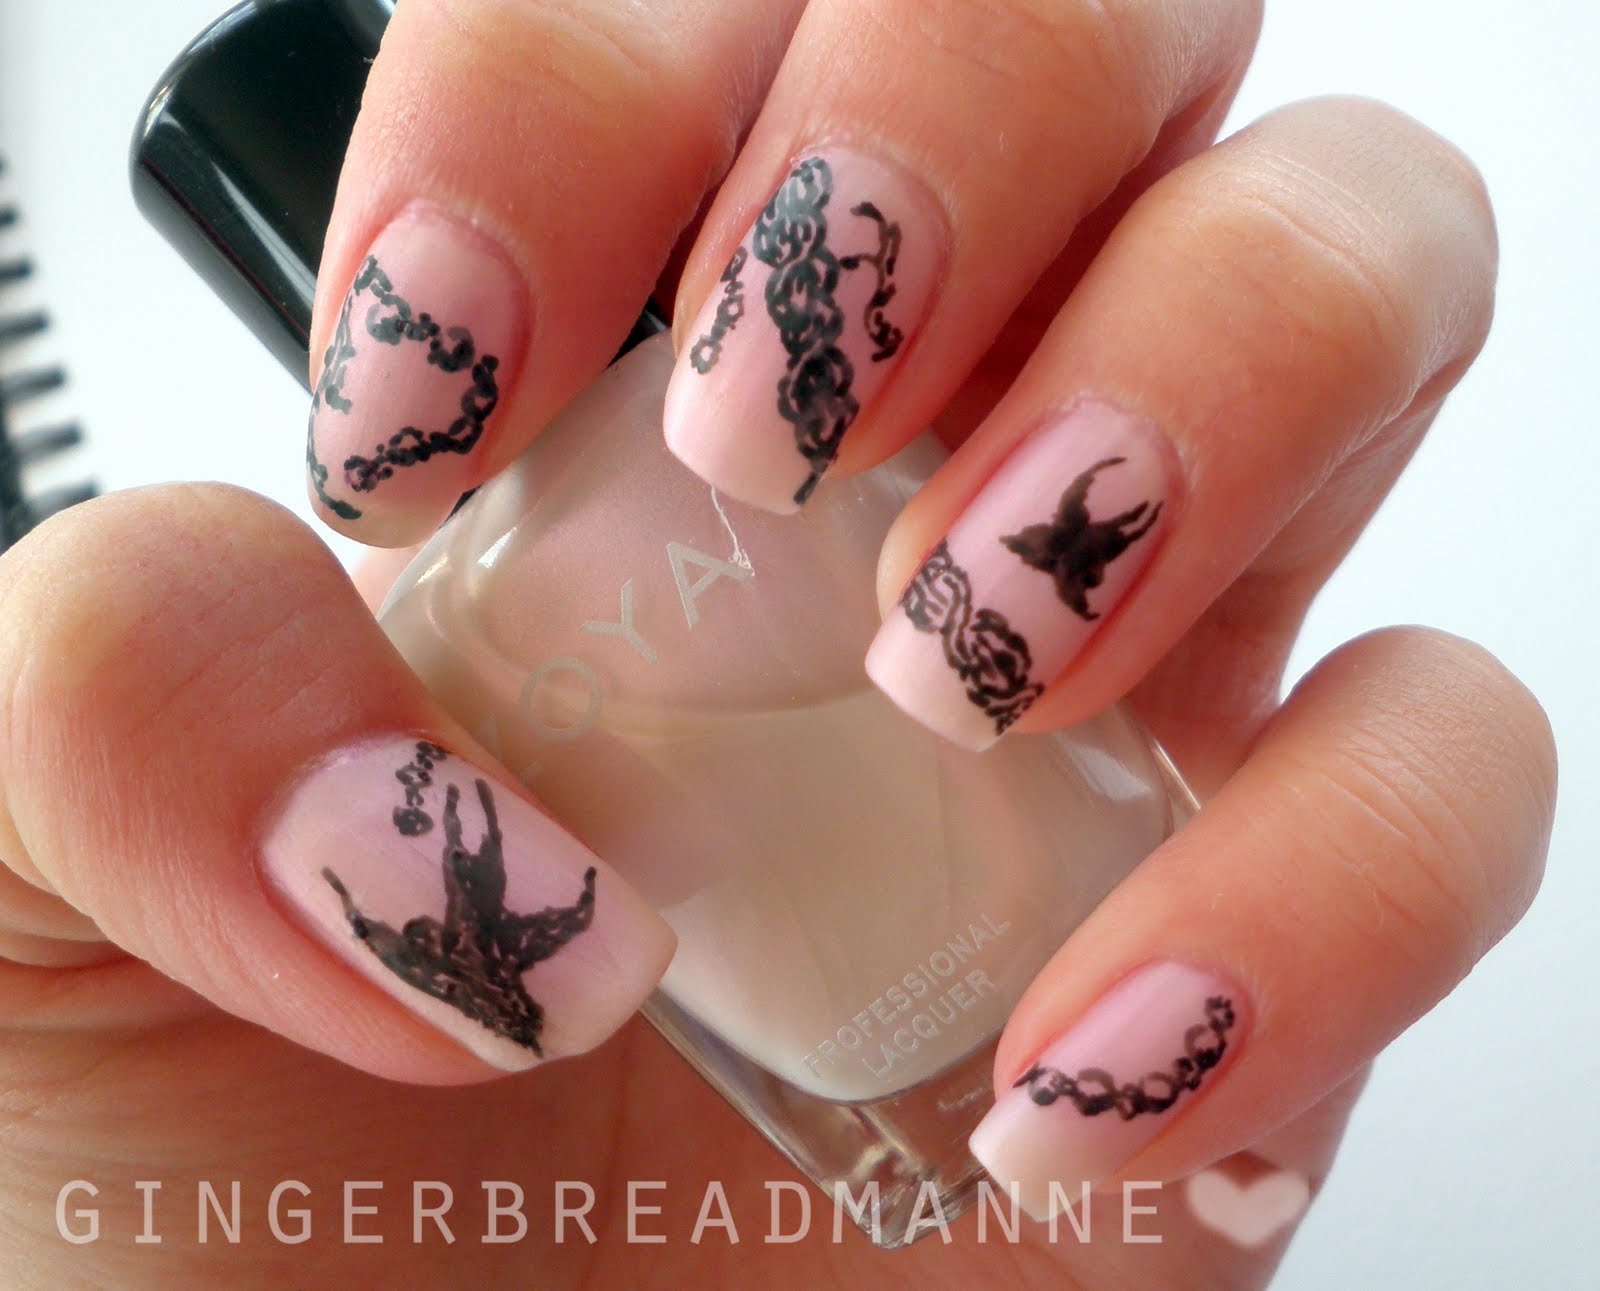
Here's the result:

I love how the sticker just moulds itself to my nail without any wrinkles or manual adjustments. Being paranoid, I ran a light brush of top coat along the tips to prevent them from peeling but later I realised that these babies would never peel because they're essentially just nail polish with a layer of adhesive underneath.

The stupid thing I find is that there are 16 strips in one pack. Noone has 16 fingers! However, because I had cut my nails quite short, I've managed to use only 5 strips to complete the whole 2 hands. Amazing, or what? This means I can get another 2 go's out of this! Probably won't happen for another year, though.

Wear:

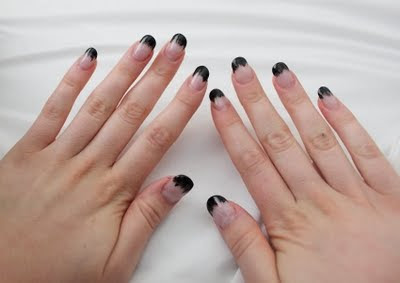
I've been rocking these flowers for exactly a week and there has been barely any signs of chipping and tip wear. I was almost kind of sad to remove them because they looked so pristine and the colours exactly like when I first applied them.

If you don't believe me, check them out for yourself:
Removal:

As instructed, I removed these exactly like how I remove nail polish. The only annoying thing is that even though the colours have been wiped off, a layer of stickiness still remained. This required me to swipe and wipe frantically with more remover to get them off.

Conclusion:

♥ Easy application (almost fool-proof). If it wasn't for the trimming, I think I'd be able to do this in my sleep.
♥ Almost no sign of wear after a week, and I take hot showers everyday. I'm pretty confident that these stickers will last for a month with no problem.
♥ Amazing designs that a normal person like myself can't or don't have the patience to do.
♥ No drying time!

Χ Quite expensive for only 1 manicure (around $12, if I remember correctly). The cost of a bottle of nail polish. However, if you have small-ish nails like I do, I think you can at least squeeze out 2 manicures.
Χ Yucky, sticky residue during removal. Takes a while to scrub off.

Verdict:

I would definitely repurchase since I've managed to complete both hands with just 5 strips. The sticky residue is something that can easily be overlooked since I go through more pain removing nail polish with large glitter particles. I would recommend this because otherwise I wouldn't be doing a review.

So "Sally Hansen Salon Effects Real Nail Polish Strips", a mouthful, but check them out if you haven't already.

Wednesday, November 9, 2011

Retroactive loving

I absolutely did not intend for this to turn out like some 70s flashback gone wrong. I mean, how badly can some polka-dots get, right? I guess it is really the "rays" of exploding colours that pushed it to the edge, so close to That 70s Show and whatever people were and still are smoking.

That was a really weird tangent and I hope I'd never have to go down that path again. So back on track, I actually really like this. Somehow, simultaneously, I am reminded of some cute yet high-classed stationery involving circus clowns and also those white sweaters with tiny, colourful pom poms. Or I could just be losing my mind?

The base is OPI Alpine Snow Matte. It has been featured in my blog before if you click here. I am a big fan of stark white nail polish (especially the matte ones) since I love how I can fool people into thinking that I've whitened my nails with liquid paper because that is just how awesome I am. Although I am not quite sure how the two would correlate.

I don't know why I had decided to do these rays of colour explosion but it does look great from afar.

I also like the randomness of the patterns and the underlying order within both hands. Spot the similarities, go on, I dare you.

Sunday, November 6, 2011

Lace therapy

This isn't my first time working with lace for nail arts but this is probably my most successful attempt thus far (on my own hands). I've only decided to give it another ago after a friend suggested that this is something worth trying. I am so lazy that I need to have people to tell me what I could be doing.

So here you have my fancy, laced up nails in all of its glory.
For base, I used OPI Mermaid's Tears since it is such a nice, cool colour. Absolutely perfect to relieve today's stickily humid weather. I've managed to get my hands on a small UV light nail dryer with a tiny built in fan. It is pretty cute and it does indeed speed up the nail polish drying process. Or maybe I'm just imagining it. Regardless, here it is, hard at work.
Tip #1: always trim the pieces to size first! It was a nightmare trying to cut off the excess on my nails.

Tip #2: only apply topcoat after everything has dried completely. I'd recommend whacking on the topcoat at least an hour after laying down the lace.
I was really tempted to cut up my black lace top for the "lace over bare nails" look. Maybe you should give it a try instead?

Saturday, October 29, 2011

I throw cats at your children

My close friends always joke (well more like theorise) that I will grow up to be one of those crazy cat ladies who chuck cats at anyone who passes their house, especially their children. But of course we ALL know it is not true since I love those cute little fluffy felines way too much to part with them. Halloween is just 2 days away so I think I am allowed to squeeze in at least one kitty power nail art, right?

I've used OPI Glow Ink the Dark (the purple-blue coloured bottle in the photo) on my thumb and ring finger. Like the name implies, it is meant to glow in the dark once you "charge" it with light. However, the glow is so faint and short, I couldn't even get a photo of it, even after shining the iPhone torch at it for a whole minute. But yet, I still purchased it along with the Halloween nail art set that it had came in. Brilliant marketing.

I'm a cheater, but a smART one (oh I am so punny). The white cats are done using 'smART nails' stencil stickers. Completely idiot proof: just stick down when the base polish has dried, brush across the stencil with your chosen nail polish colour, then peel off after a minute. They come in a pack of 10 (exactly for a complete mani) but I found that each one is actually reusable. So you can get at least 2 manis out of it!

Enjoy Halloween! Don't look at any black cats in the eye. Although I'm not sure if they'll fly at you and peck you eyes out like what magpies do.

Tuesday, October 18, 2011

Jack ol' pumpkin

With Halloween right around the corner, I thought that I should might as well get into the spirit too with some nail art since I've missed out on last year's festivity.

So I'm kicking off the holiday cheer (alright, I know, it's not a proper holiday) with our good old friend, the jack-o-lantern. I honestly cannot resist making him look all cartoony and adorable. I just want to eat him! I like pumpkins, okay?

I used China Glaze's Sun Worshipper for the base colour of the pumpkins because I absolutely love the bright neon orange (definitely not because it is the only large bottle of orange nail polish that I've got).
Attack of the wrinkly fingers! I hate flash. But it just brings out the brightness of the neon so well. It honestly would not have the same effect in daylight.

What I did was just outlined the shape of the 3/4 pumpkin, added in the stem and the vine leaf, then drew in Jack-O's face with triangle for eyes and a weird saw-toothed smile that is very charming for a pumpkin.

Nooooo, anything but the pumpkins! What Meemee would say if she could talk. Surprisingly, I think my right hand actually turned out a lot better than my left hand. I guess today was my left hand's good day. I very rarely have them. If you are ambidextrous and not clumsily right-handed like I am, then you have no reason not to give these cute little jack-o-lanterns a try this Halloween.

I sound like a commercial.

Saturday, September 17, 2011

Extra, extra!

I remember at the end of last year when I saw a photo of someone's newpaper nails, I immediately wanted to give it a try. However, there weren't enough tutorials (actually, none in English) so I was a little skeptical of the process since Google translations doesn't seem to possess any ability to construct grammatically correct sentences. Half guessing, I tried the nail art using methylated spirits thinking vodka itself is ethanol so that means it should be more effective if I use something with 100% ethanol like methylated spirits.

I was wrong.

I know, you're probably not surprised. That made me put off newpaper nails for almost a whole year.

This time, using my secret stash of peach vodka, I've successfully created my every own newspaper nail art. My nails also smelt like peach afterwards (bonus).

I decided to stick by the traditional colour and painted my nails a nice neutral base, Orly's Pure Porcelain. This polish was thick and difficult to apply but the upside was that I only needed 1 coat for complete opacity. But I whacked on a second coat to smooth out the streaks. I'm still drooling over the smoothness.

In order for the newspaper print to be transferred, the base polish needs to be completely dried. Being extremely impatient, I accelerated the process by using Qtica's Half Time Polish Drying Accelerator, those liquid ones that come with droppers, and this didn't at all affect the newspaper print transfer.
I love trying to decipher the mirrored words but it'd definitely be amazing if they made newspaper that was printed backwards so the print would come out the right way on my nails. My only selfish request, not too much to ask for, is it?

Sunday, September 4, 2011

Nailling tattoo

The fact that the felt tip pen has not left my hand since the beginning of this semester has gotten me thinking about how I can somehow make that into a nail art tool. I remember a while back, I posted an entry where I had used a biro pen to draw on Essie's Matte About You matte topcoat. A felt tip pen is much inkier and doesn't dig into the nail polish surface, making it an accident-proof nail art pen.

So with the "how" solved, my mind wandered towards Chanel's temporary tattoos. I've always wanted to get my hands on them ever since I had heard about them early last year but common sense prevailed.

Enough of my blabberings, I'm quite excited to share with you what I think is a rather good turn out for a design that is so completely spontaneous, inspired by Chanel.

The base is 5 coats of Zoya's Angella. The polish is one of those sheer pink-tinted iridescent pearls. I personally dislike sheer nail polishes because it justs really troublesome appearance-wise when yucky things get caught underneath my nails like glue (blame my course), food (think rainbow sprinkles) and moisturisers. With an excessive 5 coats, the finish is semi-sheer under certain lights and almost opaque in dimmer environments.

Instead of Essie's topcoat, I decided to try out China Glaze Matte Magic's ability to withstand my crazy squiggles. Rather impressive, actually. I've been rubbing on my nails while exerting quite a bit of force and the drawing is yet to budge.

Here's the basic precedure that I had followed to create this:
1. Basecoat (always always always, I absolutely cannot stress this enough).
2. Base colour (in this case, Zoya Angella).
3. Matte topcoat.
4. Attack your nails with whatever pens and colours you've got handy. I've yet to try it with gel pens.
5. After the pen drawing is dried, seal the design with another layer of matte topcoat, or normal, depending on the finish you're chasing.

To my surprise, the whole process had taken less time than a normal manicure since matte topcoats dry in a flash, even faster than those polishes that claim to "dry with in 60 seconds (liars)". This is so much cheaper than those Chanel tattoos and just as effective, in my opinion.

Sunday, August 21, 2011

Haul-lo from the U S of A

I marvel at my extraordinary ability to make dodgy puns.

America was heaven for a nail polish addict like me when compared to Australia. I live in a hole. That's my conclusion. Why does the stupid island of a continent have to double the price for everything? I've found so many 'old' polishes that I've been craving for heaps long like Lincoln Park at Midnight in Nordstrom Rack for just $8 a bottle. Absolute Bliss, with a capital B.

I really want a DSLR. The quality of the photo is so very different, in a good way, of course. Compare this photo taken with my friend's DSLR to the terrible photos from my dummy point-and-shoot camera.

The bottles look so shiny and the colours look so true! So on the top row of Essie from left to right: Silken Cord, Splash of Grenadine, Lilacism, Borrowed & Blue, Smokin' Hot, and Over the Top. Bottom row of OPI and Orly from left to right again: Malaga Wine, Lincoln Park at Midnight, La Playa, Royal Navy, Pure Porcelain, Winter Wonderland, Stranger Tides, and Mermaid's Tears.

There are also OPI's Lucky Lucky Lavender, Suzi Says Feng Shui and Russian Navy, plus Sephora by OPI's Queen of Everything and Spark-tacular! that somehow I had forgotten to photograph. Great memory I've got there.

This haul definitely saves me from making that agonisingly long trip to Bankstown.

Bling bling, Blinx!

I am way too lazy for my own good. I've gone to American for 3 weeks during my semester break and had a blast. Its been 5 weeks since I've been back and somehow my blog had just completely slipped my mind. I've brought back a whopping 18 bottles of nail polish. I'm so excited to try them all but I haven't been motivated to paint my nails since I got back because catching a 20kg suitcase with my nails wasn't the smartest thing to do. So now I'm forced to look at ugly, stubby nails until they grow back.

Now onto something less depression and whingey. Before I left for the States, I tried out these fabulous things called Blinx. They're pretty much the less expensive version of Minx, great for poor students like myself. They're just like stickers but except the $18 had paid off and these babies had stayed on for a good week, minimum. They've gone through the hot showers, humid weather and any other type of abuse imaginable and only very very minor lifting was witnessed.

Like I always say, I am an absolute sucker for shiny and reflective surfaces. My vanity is really coming through. I love these babies. I've gotten countless compliments while I was wearing them. I was kind of sad when I had to peel them off cos I had been wearing them for almost 2 weeks. Removal was easy peasy. They didn't leave any sticky residue and neither had they damaged my nails.

I am extremely impressed with Blinx nails. Personally, I think it's definitely worth your time to check them out. And with such affordability and durability, you can look glamourous everyday. I'm starting to sound like a commercial so I'll shut up and let you do the judging.

Monday, June 13, 2011

Formal raspberry

I painted my nails after surviving a whole day with very naked nails. Nothing special, really. This nail art is pure spontaneity, like 99% of what I do. Ever since receiving my Zoya polishes, I've been dying to try this colour out. I've also been getting this overwhelming urge to stick billions and trillions and gazillions of useless rhinestones onto my nails. Completely random, I know. So obviously, the ring finger was the first to happen.
The rhinestones were actually red in colour. In my dark, dim study at 10PM, Zoya Quinn appeared a lot redder than its actual burgundy-wine-ish colour. I've realised my mistake after I stuck those little buggers on. Being me, I was too lazy to redo that nail so I painted the rhinestones instead.
But amazingly, the rhinestones still retained their glow! I'm happy. I am in love with this polish. Love! Love love! Love love love! Then I whacked bows everywhere because a girl can never have too many bows. But I do have to admit that my ring finger looks like a giant rapsberry while the bows remind me of tuxedos. I should get some sleep before I start seeing penguins.
The white lines and patches are done with L.A. Colour Art Deco. And of course, 10 millions layers of top coat on top of everything. The other hand is kind of plain in comparison but a mistake on the pinky of that hand (I call it a "happy accident") had given me a brilliant idea for my next new manicure. Stay tuned for my stroke of brilliance!

Friday, June 10, 2011

Long overdue haul

I'd have to admit that this haul is at least 2 months overdue. So my sincere apologies.

The reason I thought that I really need to post about these is not purely due to my fanatical obsession with nail polish, but instead I'd really like to promote these Ebay sellers out of the goodness of my heart. I haven't been paid, asked, or even contacted by these sellers (I doubt anyone ever will). I've just been incredibly impressed by the amazing service and of course, affordability of their products.

I've gotten OPI's Katy Perry Collection from justpolish. I'm so responsible that I've even linked the Ebay store for you.
The reason that I love this seller is that when the polish arrived, one bottle was completely shattered and leaked over the bottle that it was bound with. I know that it is most likely due to the envelope (with layers and layers of bubble wrap, of course) packaging but I had no problems in my previous experiences with such method. However, I messaged the seller immediately to tell them that a bottle had shattered (ironically, it is called "The One that Got Away) and they've sent out a replacement the very next day without any hassle, which I received within a week's time! It was so incredibly fast for shipping from America because Australia is such a hole.
Definitely a shop to check out, simply because of its amazing service.

Secondly, onto my Zoya haul. In my opinion, Zoya has some of the most unique colours and I've always been a sucker for eye-catching fingertips. I've gotten 8 bottles from sparkling*nails and I've been so lucky to received very useful free gifts because I've spent over USD$50 on their items.

Along with my nail polish, I've gotten the Zoya Remove+ (nail polish remover) and the Qtica Half Time Polish Drying Accelerator as free gifts. Both of these babies work miraculously. I would definitely recommend these to purchase and repurchase and stock up in your nuclear-proof bomb shelter.I have yet to try out all of the new polishes and since I have quite a few nail arts in mind, I'll try my best to execute them using these new shades. However, everything shall depend on how lazy I'm going to be feeling. Don't get your hopes up too high, just saying. I kid. Do I really?

Thursday, June 9, 2011

Brushes of sparkling dusk

I'm back! I haven't abandoned you nor forgotten about you. I've just been frustratingly busy with uni work. Its either that or UHU glue. Those stringy buggers are my manicures' worst enemies! Model building with balsa wood (and other weird and wonderful things) have completely destroyed my nails. Heck, I've been painting my nails, very frequently, I might add. The only problem was that I never seemed to have time to catch them before they are destroyed by UHU glue, again. There had been so many photos that I wish I had taken so I'd actually have things to showcase on this blog.

I know that wasn't a very proper apology (it was actually me trying to save my own backside), so here's a huge big SORRY..
Now that's out of the way, let's move onto the more exciting things.

A few days ago, dear Kimberly showed me this link:
So being me, I naturally accepted the challenge. But why have plain ol' black when purple is the new black? Or so I keep telling myself. This is what I've managed to scrape together.
The iridescent base is 2 coats of Zoya's Angella. Dry strokes of Revlon's Primal Purple is used for the tip. Glitter in the form of OPI's Teenage Dream is added on top of the purple because glitter is my comfort food. Well not technically edible but you understand what I mean.
I still owe you quite a few more entries so stay tuned in the next couple of days when I'll be spam posting to make up for my absence.

Wednesday, April 20, 2011

Easter chickabunbun

So Easter is fast approaching and I've only just found the time to fix my nails. I don't really feel like typing at the moment so I'll just let you indulge in the photos if "indulge" is the right word.

I've used OPI Banana Bandana for the chicks but I kind of wish that I had something thats a little more opaque. But otherwise I'm happy.

It's meant to be an Easter egg on my thumb. But the square tip has totally destroyed that.

Happy Easter everyone!

Tuesday, March 29, 2011

Haute for polka

I've had Essie Haute as Hello sitting on my shelf for ages. I kind of forgot that I had it because I've always thought that it was a warm-orangey colour and those colours definitely do not flatter my already very yellow hands. Boy was I wrong.
Essie Haute as Hello is a light coral that is almost neon in colour. Because of this, the polish itself dries in a semi-matte state that is rather sheer (requiring at least 3 coats but I got lazy and managed to get away with only 2). Polka dots and random cloud-like shapes seem to do the job of disguising the slight uneven streakiness.
I love how this polish is both warm and cool at the same time, almost like a neutral shade that is able to accomodate just about any skin tone. You're more than welcome to prove me wrong.

Sunday, March 27, 2011

Beware, cougar!

I've kept my promise from the previous entry so here's the second post of this week. I'm rather excited about this and you'll soon see why.

Dear Whiney had brought back some brilliant nail stickers from Japan. I wish she had packed a whole suitcase full of them because they are simply gorgeous! Remember when I was raving on and on about Minx and other foil-like nail manicures? This is the next best thing, if not even better! I'm a sucker for the reflective result that normal nail polish cannot achieve.
These little babies are actually stickers, rather than foils. The application is absolutely fool-proof. Just trim to size, sticker and rub. No creases, just sexy smoothness.
I love you, Whiney! Thank you so much for bringing back such a wonderful creation! I wish Australia was less deprived.

Monday, March 21, 2011

Diamonds in the air

First up, I'd have to apologising for not posting since over 2 months ago (dear oh dear). As a very bad attempt to justify this uber long period of inactivity, I'd have to blame China because that country has blocked just about everything that is even remotely entertaining. No Youtube, no Twitter, no Tumblr, no Wordpress, no Blogger, no Facebook and just about every other 'social' sites.

Now let's get onto the more important things. I've been feeling very lazy lately. I'm still not used to uni's insane workload. I also had to cut my nails extremely short while I was in China because somehow my nails just kept on breaking, so I don't want to show the world my bald fingers. My nails are now finally at an acceptable length! I had to do something to celebrate, right?

I used 2 coats of China Glaze Light as Air because I haven't gone nail polish shopping in quite a while and I've used up every single colour because I am that deprived oh wow I'm rambling because I am that sad and now how many "because" have I said? So I don't know why but it ended up being kind of streaky. Had my nail painting skills deteriorated? So what better way is there to cover up streakiness than with plenty of glitter (Essie Silver Bullion)?
I couldn't help decorating my ring finger since I haven't done a proper nail art in ages. I regret not doing the whole manicure in it as personally I believe it had turned out pretty darn good. I promise to update again this week so stay tuned!

Monday, January 10, 2011

Strawberry surprise!

This is 10 days late but happy new year to you all. My unspoken new year's resolution of blogging more frequently is an absolute failure. I still paint my nails a lot but I always forget to photograph them and by the time that I do remember, the tips are worn and sometimes even chipped. Nothing's blog-quality these days.

Moving on. I've been wanting to do strawberry nails for quite some time. I had finally gotten around to them last night. I'm pretty happy with how they've turned out, exceeding my expectations, even.
3 coats of Zoya Gilda was used as the base. The sparkly fuschia pink is an amazing shade in its own right. But I was pleasantly surprised when it was coupled with China Glaze Four Leaf Clover for the tip. Four Leaf Clover is one of the hardest colours to photograph. It is a lot greener in real life, leaning towards a forest green. Gold bullions are stuck on to represent the strawberry seeds. Strawberry seeds are yellow. Don't try to argue otherwise because I know I am right. I've been through this with countless people.
The gold bullions feel really funky when I run my fingers over them (in a good way) because they're so bumpy.
I hope I've inspired you to strawberry-fy your hands. Yellow nail polish can be used instead of gold bullions if you find that they are difficult to locate. I've seen small bottles of bullions in Morning Glory. But I get them from Ebay in those wheels. Now I need to get some whipped cream.